Posts

Angularjs with initialize the variable

<!DOCTYPE html> <html> <script src="https://ajax.googleapis.com/ajax/libs/angularjs/1.4.8/angular.min.js"></script> <body> <div ng-app="" ng-init="firstName='John'"> <p>The name is <span ng-bind="firstName"></span></p> </div> </body> </html>

Angularjs for responsive UI

Image
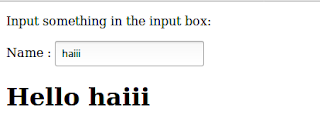
<!DOCTYPE html> <html> <script src="https://ajax.googleapis.com/ajax/libs/angularjs/1.4.8/angular.min.js"></script> <body> <div ng-app=""> <p>Input something in the input box:</p> <p>Name : <input type="text" ng-model="name" placeholder="Enter name here"></p> <h1>Hello {{name}}</h1> </div> </body> </html>

Basic Git Command for first time github user

The directory we decided to name "box". To initialize a Git repository here, type the following command: $ git init "box" directory now has an empty repository in /.git/. The repository is a hidden directory where Git operates. let's type the git status command to see what the current state of our project is: $ git status

Python IMAP list response, listing mailboxes, mailbox status, selecting_mailbox, searching messages, search criteria, fetching messages, whole messages, uploading messages, moving and copying messages, deleting messages, delete mailbox,search with uid

#  https://github.com/sanuptpm/imap import imaplib import re import email import time import email.message from imap_conf import open_connection list_response_pattern = re.compile(r'\((?P<flags>.*?)\) "(?P<delimiter>.*)" (?P<name>.*)') # print "list_response_pattern :", list_response_pattern def parse_list_response(line):     flags, delimiter, mailbox_name = list_response_pattern.match(line).groups()     mailbox_name = mailbox_name.strip('"')     return (flags, delimiter, mailbox_name) # Listing mailboxes def listing_mailboxes():     resp, data = c.list()     # IMAP instance     print "\nIMAP4_SSL instance :", c     # First parameter of the c.list()     print '\nResponse code:', resp     # Second parameter of the c.list()     print "\nmailboxes available for an account :", data     # Get the status...

How to configure IMAP in python

import imaplib def open_connection ( verbose = False ): # Connect to the server connection = imaplib.IMAP4_SSL( ' servername ' ) # Login to our account connection.login( ' username ' , ' password ' ) return connection # if __name__ == '__main__': # c = open_connection(verbose=True) # try: # resp, data = c.list() # print "\nIMAP4_SSL instance :", c # print '\nResponse code:', resp # print "\nmailboxes available for an account :", data # finally: # c.logout()

How To Install Golang compiler on Ubuntu

Image
$ sudo curl -O https://storage.googleapis.com/golang/go1.6.linux-amd64.tar.gz $ sudo tar -xvf go1.6.linux-amd64.tar.gz $ sudo mv go /usr/local $ sudo vim ~/.profile At the end of the file, add this line: export PATH=$PATH:/usr/local/go/bin $ export GOROOT=$HOME/go $ export PATH=$PATH:$GOROOT/bin $ source ~/.profile Create a new directory for your Go workspace, which is where Go will build its files. $ mkdir $HOME/work $ export GOPATH=$HOME/work $ mkdir -p work/src/github.com/user/hello $ vim work/src/github.com/user/hello/hello.go Inside your editor, paste in the content below, which uses the main Go packages, imports the formatted IO content component, and sets a new function to print 'Hello World' when run. package main import "fmt" func main() {     fmt.Printf("hello, world\n") } compile it invoking the Go command install. $ go install github.com/user/hello The file compiled, you can run it by simply referring to the file at your Go path. $ sudo $GOPATH...

How to use bluetooth speaker in ubuntu

Image
Restart the bluetooth service   sudo /etc/init.d/bluetooth restart Pair your blue-tooth  speaker again and connect it Go to sound settings. From the output device tab you should now see the blue-tooth  speaker listed along with internal speakers Choose it as the sound output device, play music with blue-tooth  speaker.

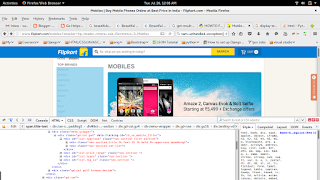
How to get href value of each a tag from the html using python Beautiful Soup

Image
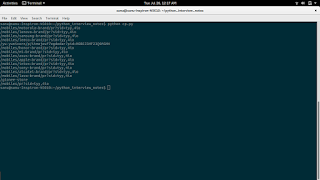
import requests from bs4 import BeautifulSoup link = "http://www.flipkart.com/mobiles?otracker=hp_header_nmenu_sub_Electronics_0_Mobiles" doc = requests.get(link) soup = BeautifulSoup(doc.text, 'html.parser') main_div = soup.find(id="list-tagcloud") div2=main_div.find_all('div')[1] links = div2.find_all('a') for link in links:     print link.attrs.get('href') OUTPUT ====== /mobiles/motorola~brand/pr?sid=tyy,4io /mobiles/lenovo~brand/pr?sid=tyy,4io /mobiles/samsung~brand/pr?sid=tyy,4io /mobiles/leeco~brand/pr?sid=tyy,4io /yu-yunicorn/p/itmejeuf7egdedar?pid=MOBEJ3MF23Q9MGMH /mobiles/honor~brand/pr?sid=tyy,4io /mobiles/mi~brand/pr?sid=tyy,4io /mobiles/asus~brand/pr?sid=tyy,4io /mobiles/apple~brand/pr?sid=tyy,4io /mobiles/intex~brand/pr?sid=tyy,4io /mobiles/sony~brand/pr?sid=tyy,4io /mobiles/alcatel~brand/pr?sid=tyy,4io /mobiles/lava~brand/pr?sid=tyy,4io /gionee-store /mobiles/pr?sid=tyy,4io

How to dispaly data from html tags using python Beautiful Soup

Image
import requests from bs4 import BeautifulSoup link = "http://www.flipkart.com/mobiles?otracker=hp_header_nmenu_sub_Electronics_0_Mobiles" doc = requests.get(link) soup = BeautifulSoup(doc.text, 'html.parser') main_div = soup.find(id="list-tagcloud") div2=main_div.find_all('div')[1] for x in div2.strings:     print x OUTPUT ====== Motorola Lenovo Samsung LeEco Yunicorn Honor Mi Asus Apple Intex Sony Alcatel Lava Gionee All

Find all the URLs found within a page’s using python

Find all the URLs found within a page’s from bs4 import BeautifulSoup html_doc = """ <html><head><title>The Dormouse's story</title></head> <body> <p class="title"><b>The Dormouse's story</b></p> <p class="story">Once upon a time there were three little sisters; and their names were <a href="http://example.com/elsie" class="sister" id="link1">Elsie</a>, <a href="http://example.com/lacie" class="sister" id="link2">Lacie</a> and <a href="http://example.com/tillie" class="sister" id="link3">Tillie</a>; and they lived at the bottom of a well.</p> <p class="story">...</p> """ soup = BeautifulSoup(html_doc, 'html.parser') for link in soup.find_all('a'):     print link.get('href...

How to use BeautifulSoup in python

BeautifulSoup 4 in Python.Beautiful Soup is a Python library for pulling data out of HTML and XML files. html_doc = """ <html><head><title>The Dormouse's story</title></head> <body> <p class="title"><b>The Dormouse's story</b></p> <p class="story">Once upon a time there were three little sisters; and their names were <a href="http://example.com/elsie" class="sister" id="link1">Elsie</a>, <a href="http://example.com/lacie" class="sister" id="link2">Lacie</a> and <a href="http://example.com/tillie" class="sister" id="link3">Tillie</a>; and they lived at the bottom of a well.</p> <p class="story">...</p> """ from bs4 import BeautifulSoup soup = BeautifulSoup(html_doc, 'html.parser') #prin...

Status Codes

Note     1xx: Informational - Request received, continuing process     2xx: Success - The action was successfully received, understood, and accepted     3xx: Redirection - Further action must be taken in order to complete the request     4xx: Client Error - The request contains bad syntax or cannot be fulfilled     5xx: Server Error - The server failed to fulfill an apparently valid request         Available Formats Value     Description    100     Continue 101     Switching Protocols 102     Processing 103-199     Unassigned     200     OK 201     Created 202     Accepted 203     Non-Authoritative Information 204     No Content 205     Reset Content 206     Parti...

How to write simple unit test in django

Success Run test file ============== tests.py ===== from django.test import TestCase # Create your tests here. class TestStringMethods(TestCase):     def test_upper(self):         self.assertEqual('foo'.upper(), 'FOO')     def test_isupper(self):         self.assertTrue('FOO'.isupper())         self.assertFalse('Foo'.isupper()) Success Run test file ============== $./manage.py test Creating test database for alias 'default'... .. ---------------------------------------------------------------------- Ran 2 tests in 0.664s OK Destroying test database for alias 'default'... --------------------------- Failed Run test file ============ tests.py ===== from django.test import TestCase # Create your tests here. class TestStringMethods(TestCase):     def test_upper(self):      ...

How to write logging in django

settings.py ------------------ # https://docs.python.org/2/library/logging.html#logrecord-attributes   LOGGING = {     'version': 1,     'disable_existing_loggers': False,     'formatters':{         'details':{             'format':'%(asctime)s %(process)d %(filename)s %(funcName)s %(lineno)d %(levelname)s %(message)s'         },     },     'handlers': {         'file': {             'level': 'DEBUG',             'class': 'logging.FileHandler',             'filename': 'location for/ log file/debug.log',             'formatter': '...

How to copy files from remote to home machine using scp

$ scp <domain name>:/home/file.txt /home/sanu/Videos/

NameError: name 'logging' is not defined

logger = logging.getLogger(__name__) NameError: name 'logging' is not defined this error is occurs due to you are not import loggin >>>import logging

AttributeError: Got AttributeError when attempting to get a value for field `abc` on serializer `PfleSerializer`. The serializer field might be named incorrectly and not match any attribute or key on the `QuerySet` instance. Original exception text was: 'QuerySet' object has no attribute 'abc'.

AttributeError: Got AttributeError when attempting to get a value for field `abc` on serializer ` PfleSerializer `. The serializer field might be named incorrectly and not match any attribute or key on the `QuerySet` instance. Original exception text was: 'QuerySet' object has no attribute 'abc'. >>> p=Pfle.objects.all() >>> seri=PfleSerializer(p,many=True) >>> seri.data

How to rename folder using command prompt

mv oldfolder/ newfolder/

How to use SSH for webfaction

Linux systems, you can start and SSH session with the command line program ssh . At the command line, enter $ ssh username @ server_name .webfaction.com   and press Enter

show databases and tables in MySQL

mysql> show databases; +--------------------+ | Database           | +--------------------+ | information_schema | | django_db          | | mysql              | | performance_schema | | sys                | | test               | +--------------------+ 6 rows in set (0.52 sec) mysql> use test; Reading table information for completion of table and column names You can turn off this feature to get a quicker startup with -A Database changed mysql> show tables; +----------------------------+ | Tables_in_test             | +----------------------------+ | auth_group         ...