Posts

Showing posts with the label Openstack

How to connect to OpenStack Keystone API using keystoneclient

>>> import keystoneclient >>> from keystoneclient.v2_0 import client >>> keystone = client.Client(username="admin", password="*****", tenant_name="admin", auth_url="http://192.168.56.101:5000/v2.0", debug=True) >>> print  keystone.tenants.list()  [<Tenant {u'enabled': True, u'description': None, u'name': u'admin', u'id': u'13b447285765463b8f4836f5cbb80f05'}>, <Tenant {u'enabled': True, u'description': None, u'name': u'service', u'id': u'9369242879854fa19630a7aa1a7c30d9'}>, <Tenant {u'enabled': True, u'description': None, u'name': u'invisible_to_admin', u'id': u'9b478397b98f4e8d9693128be8ddd2fb'}>, <Tenant {u'enabled': True, u'description': None, u'name': u'demo', u'id': u'aa02b89cb14748ca9eb77788b9...
How to connect to OpenStack Keystone API using novaclient

>>> USER = 'admin' >>> PASS = '*****' >>> TENANT = 'admin' >>> AUTH_URL = "http://192.168.56.101:5000/v2.0" >>> >>> from novaclient.v1_1 import client >>> >>> nt = client.Client(username=USER, api_key=PASS, project_id=TENANT, auth_url=AUTH_URL, service_type='compute') >>> >>> >>> >>> >>> print nt.flavors.list() [<Flavor: m1.tiny>, <Flavor: new>, <Flavor: m1.small>, <Flavor: m1.medium>, <Flavor: m1.large>, <Flavor: m1.nano>, <Flavor: m1.heat>, <Flavor: m1.xlarge>, <Flavor: m1.micro>] >>> >>>  >>> >>>  >>> obj=nt.flavors.list() >>> obj[0] <Flavor: m1.tiny>

Open the Openstack console in new window

Image
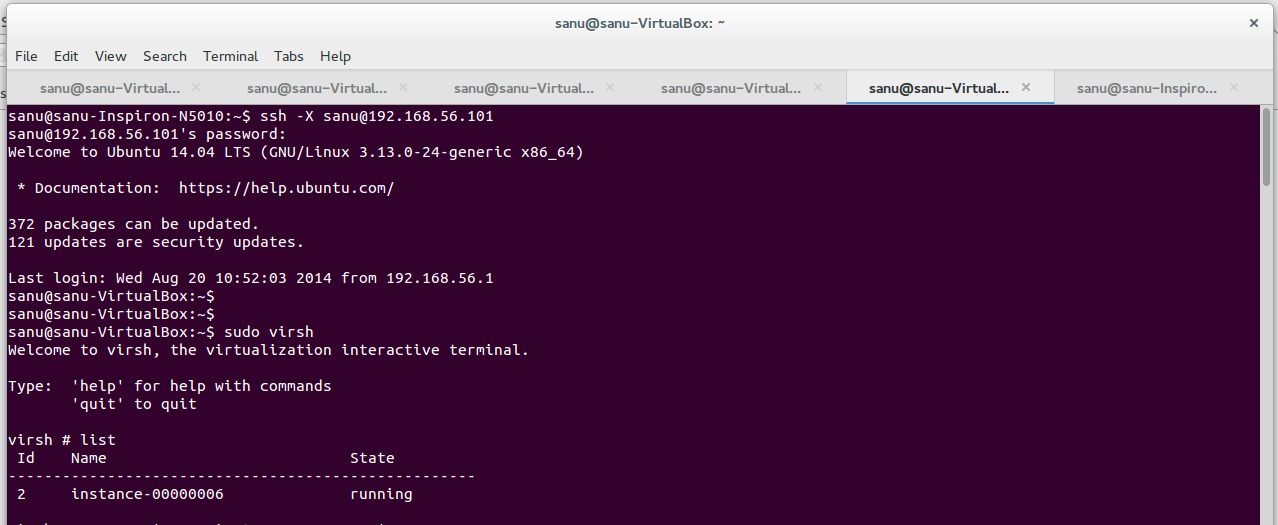
Open the Openstack console in new window  $  ssh -X username@192.168.06.01  $  sudo virsh  $  ps -aux | grep vmname | grep vnc  $  sudo apt-get install vncviewer $  vncviewer :0    

How to Creating a dashboard in Openstack

Image
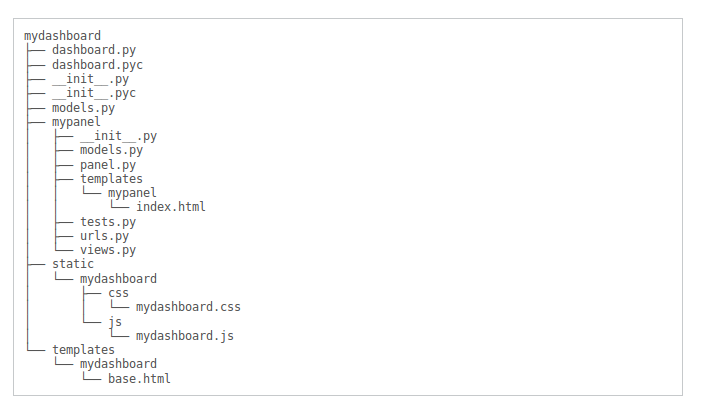
Creating a dashboard mkdir openstack_dashboard/dashboards/mydashboard ./run_tests.sh -m startdash mydashboard \ --target openstack_dashboard/dashboards/mydashboard mkdir openstack_dashboard/dashboards/mydashboard/mypanel ./run_tests.sh -m startpanel mypanel \ --dashboard=openstack_dashboard.dashboards.mydashboard \ --target=openstack_dashboard/dashboards/mydashboard/mypanel       Defining a dashboard   Open the dashboard.py file.  The following code has been automatically generated: from django.utils.translation import ugettext_lazy as _ import horizon class Mydashboard ( horizon . Dashboard ): name = _ ( "Mydashboard" ) slug = "mydashboard" panels = () # Add your panels here. default_panel = '' # Specify the slug of the dashboard's default panel. horizon . register ( Mydashboard )       Creating a panel Open the pane...

Run Openstack in browser

got to /opt/stack/horizon then run #./run_tests.sh then you can see yes/no prompt. Type 'yes' and press enter.       that will create a hidden virtual environment named .venv. type ls -a to see that virtual enviromnet       then activate that enviromnent like #source .venv/bin/activate         then stop apache2 server #sudo service apache2 restart then run django server like #python manage.py runserver 0.0.0.0:8003         then access horizon like http://192.168.56.101:8003    

How to Restart Apache server For Ubuntu

$ sudo service apache2 restart

Add review comment "recheck-vmware" to retrigger a new build.

Image
if you get this result ,the press  Add Comment and past "recheck-vmware"

ImportError: No module named bs4

$ ./topy.py /home/sanu/horizon/horizon/views.py home/sanu/virt_env/virt1/local/lib/python2.7/site-packages/pkg_resources.py:1045: UserWarning: /home/sanu/.python-eggs is writable by group/others and vulnerable to attack when used with get_resource_filename. Consider a more secure location (set with .set_extraction_path or the PYTHON_EGG_CACHE environment variable). warnings.warn(msg, UserWarning) Traceback (most recent call last): File "./topy.py", line 24, in <module> from bs4 import BeautifulSoup ImportError: No module named bs4 $ easy_install beautifulsoup4 Searching for beautifulsoup4 Reading https://pypi.python.org/simple/beautifulsoup4/ Best match: beautifulsoup4 4.3.2 Downloading https://pypi.python.org/packages/source/b/beautifulsoup4/beautifulsoup4-4.3.2.tar.gz#md5=b8d157a204d56512a4cc196e53e7d8ee Processing beautifulsoup4-4.3.2.tar.gz Writing /...

ImportError: No module named regex

$ ./topy.py /home/sanu/horizon/horizon/view.py Traceback (most recent call last): File "./topy.py", line 21, in <module> import regex ImportError: No module named regex $ sudo apt-get install python-dev [sudo] password for sanu: Reading package lists... Done Building dependency tree Reading state information... Done The following extra packages will be installed: libexpat1-dev libpython-dev libpython2.7-dev python2.7-dev The following NEW packages will be installed: libexpat1-dev libpython-dev libpython2.7-dev python-dev python2.7-dev 0 upgraded, 5 newly installed, 0 to remove and 0 not upgraded. Need to get 22.4 MB of archives. After this operation, 35.1 MB of additional disk space will be used. Do you want to continue? [Y/n] y Get:1 http://in.archive.ubuntu.com/ubuntu/ trusty/main libexpat1-dev amd64 2.1.0-4ubuntu1 [115 kB] Get:2 ...

How to use virtual environment in ubuntu

$ sudo apt-get install python-setuptools Reading package lists... Done Building dependency tree Reading state information... Done The following NEW packages will be installed: python-setuptools 0 upgraded, 1 newly installed, 0 to remove and 0 not upgraded. Need to get 230 kB of archives. After this operation, 830 kB of additional disk space will be used. Get:1 http://in.archive.ubuntu.com/ubuntu/ trusty/main python-setuptools all 3.3-1ubuntu1 [230 kB] Fetched 230 kB in 9s (25.2 kB/s) Selecting previously unselected package python-setuptools. (Reading database ... 225639 files and directories currently installed.) Preparing to unpack .../python-setuptools_3.3-1ubuntu1_all.deb ... Unpacking python-setuptools (3.3-1ubuntu1) ... Setting up python-setuptools (3.3-1ubuntu1) ... $ sudo easy_install virtualenv Searching for virtualenv Rea...

git: 'review' is not a git command. See 'git --help'.

$ sanu@sanu-VirtualBox:~/ openstack-manuals$  git review -sgit: 'review' is not a git command. See 'git --help'.  Answer : $ sudo apt-get install git-review

git review -s WARNING: UNPROTECTED PRIVATE KEY FILE

Image
 git review -s WARNING: UNPROTECTED PRIVATE KEY FILE To fix this, you’ll need to reset the permissions back to default: sudo chmod 600 ~/.ssh/id_rsa sudo chmod 600 ~/.ssh/id_rsa.pub if you are getting another error: Are you sure you want to continue connecting (yes/no)? yes Failed to add the host to the list of known hosts (/home/geek/.ssh/known_hosts). This means that the permissions on that file are also set incorrectly, and can be adjusted with this: sudo chmod 644 ~/.ssh/known_hosts Finally, you may need to adjust the directory permissions as well: sudo chmod 755 ~/.ssh

WARNING: REMOTE HOST IDENTIFICATION HAS CHANGED

Image
There is a wrong line (line number 1)  in /home/user/.ssh/known_hosts file. Please remove that line from  /home/user/.ssh/known_hosts file. then try ssh again you can use "vim known_hosts " text editor to edit that file like #vim /home/user/.ssh/known_hosts     then type ":1" to goto line 1 and  type "d" to delete that line. then save and close that file by typing ":wq"

How to access virtual host machine in normal terminal in ubuntu

Image
1)First install ssh in  host     $sudo apt-get install ssh   2)Add network adapter     3)Find inet address(inet addr:)     $ifconfig 4)Access remote location     $ ssh <username>@<inet address>             

How to copy data from one host to another host in linux virtual Operating system

1)First install ssh in both side of host     $sudo apt-get install ssh 2)Find inet address(eth 1 inet addr:) of host machines     $ifconfig 3)Copy data     $scp <filename> <username>@<eth 1 inet addr>:/home/sanu   

How To Contribute in openstack

Steps  1 : Create Launchpad account Launchpad account  2 : After launchpad account creation join        The OpenStack Foundation https://www.openstack.org/join/         (it's free and required for all  code contributors) 3 : Visit https://review.openstack.org/ and      click the Sign In link at the top-right corner of the page.      Log in with your Launchpad ID 4 : How to Generate an SSH Key   Go : my/settings/SSH Public Keys                                OR         https://review.openstack.org/#/settings/ssh-keys click " How to Generate an SSH Key " From the Terminal run ssh-keygen                OR   ...