Posts

Showing posts from 2014

How to create my first Django Project

Image
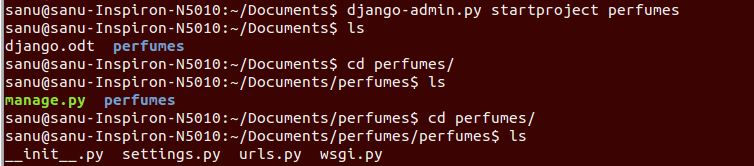
Writing your first Django app Step 1 Check django is installed and which version by running the following command $ python -c "import django; print(django.get_version())"     How to install Django $ sudo apt-get install python-pip $ sudo pip install Django       Creating a project From the command line, cd into a directory where you’d like to store your code, then run the following command $ django-admin.py startproject p erfum e s       The development server Let’s verify your Django project works. Change into the outer p erfum e s directory, if you haven’t already, and run the following commands: $ python manage.py runserver         Creating models To create your app, make sure you’re in the same directory as manage.py and type this command: $ python manage.py startapp p erfum  

How to create Django project Step 2

Image
Creating a project From the command line, cd into a directory where you’d like to store your code, then run the following command $ django-admin.py startproject p erfum e s       The development server Let’s verify your Django project works. Change into the outer p erfum e s directory, if you haven’t already, and run the following commands: $ python manage.py runserver             Creating models To create your app, make sure you’re in the same directory as manage.py and type this command: $ python manage.py startapp p erfum    

How to check django is installed and which version is running and how to install django Step 1

Image
Writing your first Django app Step 1 Check django is installed and which version is running $ python -c "import django; print(django.get_version())"     How to install Django $ sudo apt-get install python-pip $ sudo pip install Django

How to connect to OpenStack Keystone API using keystoneclient

>>> import keystoneclient >>> from keystoneclient.v2_0 import client >>> keystone = client.Client(username="admin", password="*****", tenant_name="admin", auth_url="http://192.168.56.101:5000/v2.0", debug=True) >>> print  keystone.tenants.list()  [<Tenant {u'enabled': True, u'description': None, u'name': u'admin', u'id': u'13b447285765463b8f4836f5cbb80f05'}>, <Tenant {u'enabled': True, u'description': None, u'name': u'service', u'id': u'9369242879854fa19630a7aa1a7c30d9'}>, <Tenant {u'enabled': True, u'description': None, u'name': u'invisible_to_admin', u'id': u'9b478397b98f4e8d9693128be8ddd2fb'}>, <Tenant {u'enabled': True, u'description': None, u'name': u'demo', u'id': u'aa02b89cb14748ca9eb77788b9

How to connect to OpenStack Keystone API using novaclient

>>> USER = 'admin' >>> PASS = '*****' >>> TENANT = 'admin' >>> AUTH_URL = "http://192.168.56.101:5000/v2.0" >>> >>> from novaclient.v1_1 import client >>> >>> nt = client.Client(username=USER, api_key=PASS, project_id=TENANT, auth_url=AUTH_URL, service_type='compute') >>> >>> >>> >>> >>> print nt.flavors.list() [<Flavor: m1.tiny>, <Flavor: new>, <Flavor: m1.small>, <Flavor: m1.medium>, <Flavor: m1.large>, <Flavor: m1.nano>, <Flavor: m1.heat>, <Flavor: m1.xlarge>, <Flavor: m1.micro>] >>> >>>  >>> >>>  >>> obj=nt.flavors.list() >>> obj[0] <Flavor: m1.tiny>

Vim editor Basic commands

Vim editor Basic commands    Moving through the text is usually possible with the arrow keys. h to move the cursor to the left l to move it to the right k to move up j to move down Basic operations n dd will delete n lines starting from the current cursor position. n dw will delete n words at the right side of the cursor. x will delete the character on which the cursor is positioned :n moves to line n of the file. :w will save (write) the file :q will exit the editor. :q! forces the exit when you want to quit a file containing unsaved changes. :wq will save and exit :w newfile will save the text to newfile. :wq! overrides read-only permission (if you have the permission to override permissions, for instance when you are using the root account. /string will search the string in t

How to search WORD in directory and sub-directory

This will search word in current directory and sub directory  $  grep -r " WORD " * OR $  grep -r " WORD " .

Debugging in Python

Image
$ sudo easy_install pudb To start debugging, simply insert into code from pudb import set_trace; set_trace() OR A shorter alternative to this is: import pudb; pu.db COMMANDS   Press "Enter" to goto "Edit Preferences" pop-up window. Press "Space" to select the settingsPress "Esc" to close the pop-up window Press "Ctrl" + "x" to goto Command Line. Press "Ctrl" + "x" to exit from Command Line. Press "n" to execute next line Press "s" to step into a method/function Press "c" to continue the execution select the line where you want to set the breakpoint and press "b", then you can see a red mark in that line. Then Press "c" to continue the execution and stop at breakpoint

Open the Openstack console in new window

Image
Open the Openstack console in new window  $  ssh -X username@192.168.06.01  $  sudo virsh  $  ps -aux | grep vmname | grep vnc  $  sudo apt-get install vncviewer $  vncviewer :0    

How to Creating a dashboard in Openstack

Image
Creating a dashboard mkdir openstack_dashboard/dashboards/mydashboard ./run_tests.sh -m startdash mydashboard \ --target openstack_dashboard/dashboards/mydashboard mkdir openstack_dashboard/dashboards/mydashboard/mypanel ./run_tests.sh -m startpanel mypanel \ --dashboard=openstack_dashboard.dashboards.mydashboard \ --target=openstack_dashboard/dashboards/mydashboard/mypanel       Defining a dashboard   Open the dashboard.py file.  The following code has been automatically generated: from django.utils.translation import ugettext_lazy as _ import horizon class Mydashboard ( horizon . Dashboard ): name = _ ( "Mydashboard" ) slug = "mydashboard" panels = () # Add your panels here. default_panel = '' # Specify the slug of the dashboard's default panel. horizon . register ( Mydashboard )       Creating a panel Open the panel.py f

How to login MYSQL

Image
$ mysql -uroot -p<password> mysql> show databases; +--------------------+ | Database           | +--------------------+ | information_schema | | cinder             | | glance             | | heat               | | keystone           | | mysql              | | nova               | | performance_schema | +--------------------+ 8 rows in set (0.14 sec) mysql> use keystone Reading table information for completion of table and column names You can turn off this feature to get a quicker startup with -A Database changed mysql> show tables; +-----------------------+ | Tables_in_keystone    | +-----------------------+ | assignment            | | credential            | | domain                | | endpoint              | | group                 | | migrate_version       | | policy                | | project               | | region                | | role                  | | service               | | token                 | | trust                 | | trust_role 

Run Openstack in browser

got to /opt/stack/horizon then run #./run_tests.sh then you can see yes/no prompt. Type 'yes' and press enter.       that will create a hidden virtual environment named .venv. type ls -a to see that virtual enviromnet       then activate that enviromnent like #source .venv/bin/activate         then stop apache2 server #sudo service apache2 restart then run django server like #python manage.py runserver 0.0.0.0:8003         then access horizon like http://192.168.56.101:8003    

How to Restart Apache server For Ubuntu

$ sudo service apache2 restart

How to find directory with terminal In Ubuntu

$ find . -type d | grep <dir name> Output ./topy ./topy/.git ./topy/.git/refs ./topy/.git/refs/tags ./topy/.git/refs/heads ./topy/.git/refs/remotes ./topy/.git/refs/remotes/origin ./topy/.git/hooks ./topy/.git/objects ./topy/.git/objects/3c ./topy/.git/objects/a1 ./topy/.git/objects/b3 ./topy/.git/objects/79

Add review comment "recheck-vmware" to retrigger a new build.

Image
if you get this result ,the press  Add Comment and past "recheck-vmware"

How to submit edited changes git review

Clone from git $ git clone https://github.com/openstack/cinder.git Cloning into 'cinder'... remote: Counting objects: 42771, done. remote: Compressing objects: 100% (38/38), done. remote: Total 42771 (delta 17), reused 4 (delta 0) Receiving objects: 100% (42771/42771), 20.94 MiB | 52.00 KiB/s, done. Resolving deltas: 100% (27315/27315), done. Checking connectivity... done. Go to cinder directory $  cd cinder Get the latest Patch Set $ git fetch https://review.openstack.org/openstack/cinder refs/changes/12/110312/4 && git checkout FETCH_HEAD * branch refs/changes/12/110312/4 -> FETCH_HEAD Note: checking out 'FETCH_HEAD'. You are in 'detached HEAD' state. You can look around, make experimental changes and commit them, and you can discard any commits you make in this state without impacting any branches by p

How to set git editor always as VIM

Please Just try $ git config --global core.editor "vim"

How to install and use vim editor in ubuntu

Just try this  $  sudo apt-get install vim $  vim <file name> Exit Commands :wq Write file to disk and quit the editor :q! Quit (no warning) :q Quit (a warning is printed if a modified file has not been saved) Opening a New File   Step 1 type vim filename (create a file named filename) Step 2 type i ( switch to insert mode) Step 3 enter text (enter your program) Step 4 hit Esc key (switch back to command mode) Step 5 type :wq (write file and exit vim) Editing the Existing File Step 1 type vim filename (edit the existing file named filename) Step 2 move around the file using h/j/k/l key or any appropriate command                                h Moves the cursor one character to the left                                l Moves the cursor one character to the right                                k Moves the cursor up one line                                j Moves th

How to remove unwanted files from git after git commit

Please go to directory and run this $ git rm /home/sanu/cinder/cinder/volume/drivers/emc/emc_vnx_cli.py After editing recommitte your work $ git commit -a --amend $ git review -v

How to display view count in Blogger

Image
                                       1) http://www.histats.com 2)Register 3)Login 4)Add a website 5)Click Website url 6)Click counter CODE 7)Click add new counter and select model                                                                            8)Copy standard content                          9)Click Layout option in Blogger and select gadget                                                                             10) select HTML/JavaScript                                                        11)past standard content from Histats into content

How to clone from github

Image
   Copy the HTTPS clone URL from github $ git clone https://github.com/openstack/glance.git

How to save output of git diff in local file

Image
you can get output result in local file with $ git diff > /home/sanu/myfile.diff